Saturday, January 3, 2009

Adding Some Texture

I know - I don't update this blog very often. Part of the reason is that I don't get as much time to work on the layout as I would like to. A relatively recent project was adding some texture to the ground surfaces. I added some ground foam to simulate grasses and weeds. I also added some ballast to the tracks and some other gravel elsewhere on the layout. Will trees be in the scene soon?


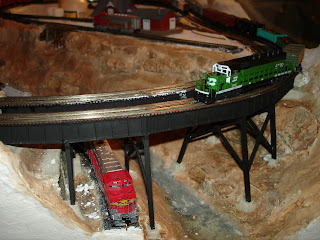
I don't happen to be terribly strict in my selection railroads or eras of my rolling stock. You'll see several road names in my layout. It helps keep some variety in the scene. Pictured here are a pair of Montana Rail Link SD-35's.


I have recently decided that I love the old Alco RS-3 locomotives. I found some at White Elephant in Spokane, WA. In Atlas tradition, they run flawlessly and have fine detail.


I have gotten some detail on the gravel depot. It included a bit of paint and weathering. Pictured here is a Burlington Northern GP-38. I have always loved the low nose GP series of locomotives!


I have not yet finished the gas station, but the details are in the works soon. They will include a sign, decals, and a few paint details (like the gas pumps).


Amanda and I managed to find Kato's Great Northern Passenger set. After some effort we managed to find all the pieces (all three sets of cars and all three locomotives). The last set we got even has the lighting kit installed already.


Here is another view of the GN F7 leading the passenger train.

"See! The Cliffs of Insanity!" Well, the cliffs of something, anyway. These rock faces looked good after I painted them, but the additional textures I made the textures look really sharp!


The BNSF C44-9 brings this scene to a much newer time period. I added some gravel in the ditch area and I put some gravel around the depot to represent the parking area.


Just for kicks, it is interesting to try seeing the same scene with different locomotives. This is an identical composure to the picture of the Montana Rail Link photo at the top of this post.

Sunday, June 3, 2007

A first portrait session

We finally have enough layout put together to have a little bit of fun running and photographing out trains. Sit back, relax, and enjoy a little layout tour.


As a complete bridge, this makes a very impressive addition to our layout. The canyon is about 4.5-5" deep at this end. That makes for about a sixty scale foot drop!


These are out favorite locomotives. Amanda loves the F-7 locomotives (red and silver), and I really like the SD40-2 (the green and the orange ones). In this unlikely photo, a BNSF locomotive passes under the bridge on its way to some town beyond the scope of our layout.


From this view, the sway bracing and the guard rails are visible in the bridge. I was amazed when I built the bridge at how much difference those x's above the tracks help to stabilize the bridge. They lock it from swaying or twisting.

A BNSF train skirts the lower edge of our canyon. I thought about the railroad tracks in the Columbia Gorge when I built this section.


Now some trains make their way to the other end of the canyon.


A Santa Fe F-7 makes a pass through the bridge.


We turned things around a bit. I am really pleased with how our "dummy track" turned out. Since the canyon is the most finished part of our layout, it looks better than any other track section right now. Ironic!

Sunday, May 20, 2007

Taking Control

One goal with this layout was to independently control two trains. This greatly complicated the wiring, but will be worth it in the end.


The control panel uses large LED's to indicate turnout position. Each turnout has a SPDT switch mounted to the underside of the solenoid. This allows the bi-color LED's to indicate position. The smaller LED's are also red/green, but they indicate which power pack is controlling each block of track. If the LED is off, the track is not powered. I used two momentary pushbutton switches per turnout and one Triple pole, double throw, center off toggle switch for each block of track. Two poles control the track wiring, and the other one controls the indicator LED's.

Wiring this beast took several days and a lot of patience. I found some perf boards to mount resistors in so I would not fry the LED's. The wires are bundled and grouped in an effort to reduce clutter, but the compartment turned out like a rat's nest anyway. Next layout: bigger space for wiring!


To make sure that we could remove the control drawer if necessary, I used terminal strips on the back as a connection between the drawer and the layout. Plugs would have allowed faster removal, but they were more expensive. This is the back of the drawer under the layout. The black plastic tubing should protect the wiring from pinches and cats.

Bridging the Gaps

Trains can't climb mountains like cars do, so they need bridges and trestles. Here is how I crossed the chasms of my layout.


The bird's eye view gives a great feel for the layout and where the gaps exist. A curved trestle has already been placed in the upper right corner. The bottom center will be bridged with a truss bridge.


Placing the trestle realistically required some fancy shaping for the footings that will look like concrete in the end. Here, they are just Styrofoam to be covered an painted later.


Most major components for my truss bridge are complete here. The tracks have been attached the the deck and the trusses assembled. Next, I will add guard rails between the regular rails and build the sway braces that will cross between trusses above the trains.


Bridge abutments were finished prior to installation of the bridge. I simply shaped plaster to look like concrete abutments. Paint will be added later.


My assembled bridge! The final step before installation will be to paint it and remove the masking tape from the rails.


With the canyon taking form, the bridges look more like they belong on the layout.

Friday, February 23, 2007

Some Progress. . .


We have nearly all of the sub-roadbed installed. The white styrofoam will be underneath all tracks except for the bridges. Also visible is a passenger station and a white rectangle representing the future gravel depot.

Not many places sell curved trestles or bridges. I had no choice but to scratch-build this double track trestle. Fortunately, there is a company that makes pre-made I-beams, H-columns, channels and other structural members. The black parts were cut off of pre-made bridges from Atlas Model RR company. These plate girders, combined with the other structural pieces (white) make an excellent bridge. I had to trace the curve and make the straight segments fit as closely as possible.

We will have an unusable track running under the trestle and bridge. Hopefully, this will look like another line passing through the area. Additionally, it will serve as another display area for our many trains.

After much planning, labor, and concentration, I have something that resembles a real trestle. It lacks only paint, tracks, some better scenery in its foundation, and a few minor detail items.


The Birth of a Layout


Amanda's dad helped us build a coffee table that will also serve as a foundation for behchwork. On one side is a drawer, on the other is a door that opens to reveal the sliding control panel.


The white strips are carefully cut pieces of butcher paper to serve as track planning templates.


Wednesday, February 14, 2007

An old hobby - revisited

Several months ago, Amanda started me talking about trains. I don't remember for sure how it got started, but it might have involved a trip to the Hobby Bench in Prescott. As we started planning to design our new entertainment center, the topic resurfaced. I hasitated to build a layout since HO trains take up so much space. Amanda suggested an N scale layout instead. Then I recalled an idea I found in a book when I was younger. We could build a coffee table with trains encased in glass! Amanda liked the idea almost as much as I did and we started designing. We built the table and have yet to have trains running inside it. This blog will highlight the progress we make.